
If you take the blob service, the default endpoint will be https://<storage-account-name>.blob.core.windows.net. For example, if the name of the storage account is mystorage01, the blob endpoint will be https://mystorage01.blob.core.windows.net. You can divide the URI into two parts: storage resource URI and the SAS token (see Figure 6.11).
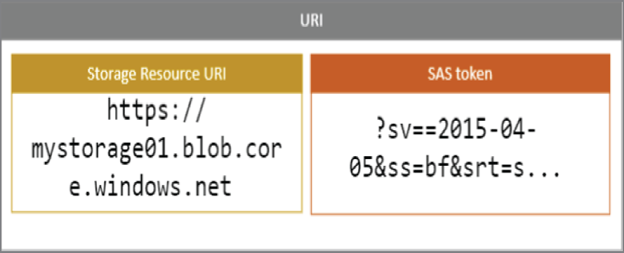
FIGURE 6.11 Storage URI
Let’s take a sample URI to explain the parameters. The following is an example URI:
https://mystorage01.blob.core.windows.net/?restype=service&comp=properties&sv=2015-04-05&ss=bf&srt=s&st=2015-04-29T22%3A18%3A26Z&se=2015-04-30T02%3A23%3A26Z&sr=b&sp=rw&sip=168.1.5.60-168.1.5.70&spr=https&sig=F%6GRVAZ5Cdj2Pw4txxxxx
Refer to Table 6.5 to understand each of the parameters.
TABLE 6.5 Understanding URI Parameters
| Parameter | URI portion | Description |
| Resource URI | https://mystorage01.blob.core.windows.net/?restype=service&comp=properties | The blob endpoint; to get the service properties, you can make a GET call to this endpoint. |
| Storage services version | sv=2015-04-05 | The version of the storage service. |
| Services | ss=bf | SAS applies to two services b=blob and f=file. |
| Resource types | srt=s | Access is granted for service-level operations, s=service. |
| Start time | st=2015-04-29T22%3A18%3A26Z | Start time of the SAS in UTC. |
| Expiry time | se=2015-04-30T02%3A23%3A26Z | Expiry time in UTC. |
| Resource | sr=b | Selected resource is a blob. |
| Permissions | sp=rw | Permission to read and write. |
| IP range | sip=168.1.5.60-168.1.5.70 | The IP address range. |
| Protocol | spr=https | Only HTTPS requests are permitted. |
| Signature | sig=F%6GRVAZ5Cdj2Pw4txxxxx | Signature that is used to authenticate access to the blob. The signature is an HMAC computed over a string-to-sign and key using the SHA256 algorithm and then encoded using Base64 encoding. |
In the next exercise, you will use the SAS to access the blob you stored in Exercise 6.1. If you have deleted the storage account, you need to re-create a new storage account and a public container and upload an image to the container. Try copying the link of the image and check if you can access the image. If everything is configured correctly, you should be able to see the image in the browser. We will reuse the container and blob to demonstrate how the SAS keys work.
EXERCISE 6.2
Working with SAS Keys
- Sign in to the Azure Portal and search for Storage Accounts.
- Open the storage account you created in Exercise 6.1. If you don’t have a storage account, create a new one using the steps outlined in Exercise 6.1.
- Open the existing container and verify you can see the blob. If you are working with a new container, make sure you upload an image to the container for testing.
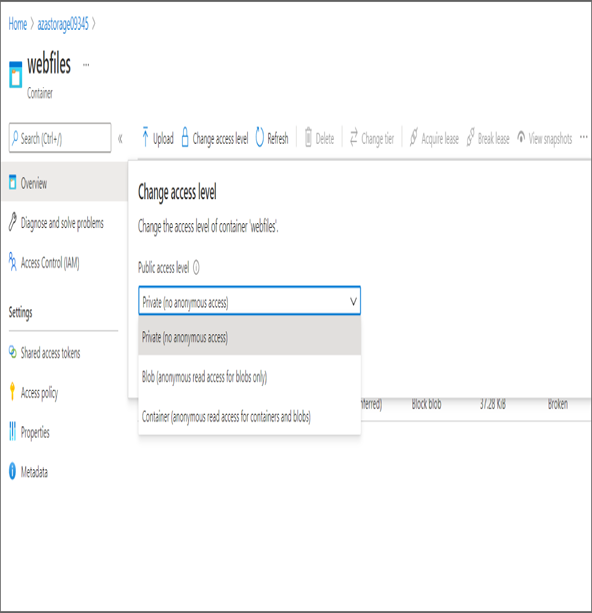
- Click Change Access Level at the top and change it to Private. Changing it to Private will block all anonymous access to the container. Click OK to save the changes.
- Click the stored blob and copy the link. Try accessing the link from the browser. You will get a ResourceNotFound error. This is because you have blocked all anonymous access to the container by setting the access level to Private.
- Remember the SAS key that you copied earlier. If not, generate a new SAS key with all the permissions shown in Figure 6.9.
- Append the SAS URL to the end of the link you pasted earlier and check if you are able to access the object stored in the storage account. As you can see, with SAS in the URL, you are able to see the image.

If you need, you can customize the parameters in the SAS key and generate a different URL based on your requirements. Next, we will cover Storage Service Encryption, which is responsible for protecting data at rest.